
At Chris Young Trailer Sales we don’t end our service after the sale is complete; we are there for you during and after the sale for the good and the bad. We have a state of the art facility to keep your trailer and you on the road. We always go over and above to satisfy our customers even the ones with tight schedules. From your basic wiring repair to a complete rebuild and everything in between, you will always leave Chris Young Trailer Sales a happy customer guaranteed.
Many trailer dealers will not service the units they sell or much less a trailer purchased from a competitor. Here at Chris Young Trailer Sales we will service anything, never questioning where it was purchased. You will receive the same great service no matter what.


This process is to be used on new trailers or used trailers with new brake shoes if brakes are not working correctly
An effective burnish cycle to seat the friction materials into the opposing rotor and drum surfaces requires approximately 200 stops. As we know this can’t happen before a trailer is sold so therefore we recommend the following burnish procedure
If you use these guidelines, the friction materials will have conformed to the surface of the drums or rotors and drastically improve your stopping performance. If you are having braking issues after correctly following this procedure your brakes may be in need of adjustment or service.
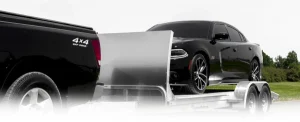
Every car enthusiast’s worst nightmare is damaging their vehicle during transport. There’s just so much that can go wrong even when you do everything right. A poorly loaded car can mean damage for it, your trailer, tow vehicle, and even you and those around you. Even though there are many different types of vehicles out there as well as many different trailers, this doesn’t mean that the process of loading and transporting isn’t similar. On the contrary, there are some basic rules that you can rely on for transporting vehicles of any size and type. You just need to follow the advice below and carefully complete each step to ensure you and your vehicle will be safe from harm.
Here at Chris Young Trailer Sales, we understand it can be a bit frustrating figuring out how to hitch and load a trailer of any kind, let alone a car hauler! Keeping your equipment in good condition and operating is utmost on our minds, so we’ve put together this short guide to loading your car hauler. Read on for some tips and tricks and when you’re ready call, or head into our showroom in North Dakota. Our team of knowledgeable and courteous professionals will help you find what you need and answer all your questions.
PREPARE YOUR TRAILER AND TOWING VEHICLE
First you gotta get your hauling equipment ready. That means parking your vehicle and trailer in-line with each other on level ground to make it as easy as possible. Once you got things lined up, turn off your engine and engage the parking brake. Hitch up the trailer as you normally would, ensuring safety chains, electronic hookups, and the hitch are all where they need to be.
LOADING THE TRAILER
Car-specific trailers should have a couple heavy duty ramps that pull out from the rear. Once you have them out and secure, line up the vehicle you intend to load from behind. It’s best to get some help for this part, having an assistant stand back and keep you on track. No one should stand between the car and trailer while loading! After you line up the car, drive up the ramp slowly, avoiding turning the wheel, until no part of the car is hanging over the back or front of the trailer. Most trailers will have just enough room, so keep things slow and steady!
SECURE THE CARGO
From there, engage the safety brake and turn off the car. Secure it with fasteners and security chains. Move each strap ratchet left or right to align it with the center of the tire and position the straps up and over the front tires to make sure they’re centered. Fasteners should be taut, while chains should have a bit of slack. Now you can stow the ramp and drive a short distance in order to make sure everything is nice and secure.
With these simple tips and tricks, you’ll be loading and hauling your car in no time with the confidence of a pro. Remember that your owner’s manual will have more specific information for your tow vehicle, trailer, and car. For more information on loading car haulers, head to Chris Young Trailer Sales, where we have the best selection of new and used trailers and trailers and car haulers around. We’re located in West Fargo ND. Come in today and we’ll show you the true meaning of customer satisfaction!
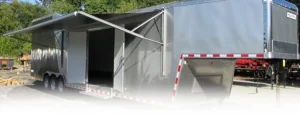 With the sun getting brighter and hotter, you’re going to want a place near your RV or Trailer for shade. Not every RV park can give you a big tree next to your site, so take good care of your awning so it’s ready to give you and your fellow campers a break from the blazing heat. Golden Gait Trailers & RVs has provided a list of maintenance tips for your awning, but we can also provide you with the right RV if you’re still looking. Just stop by today and we’ll give you the full tour.
AWNING MATERIAL
Before you get started, you’ll want to know what your awning is made of. Different materials require different care methods and supplies and if you’re not careful, you could actually damage your awning.
Odds are, your awning will be made from one of two materials: acrylic or vinyl. Acrylic awnings have a petroleum-based fabric woven into them with a natural resistance to water and mildew. Think of tent fabric, just thicker.
Vinyl awnings, on the other hand, do not contain any materials that have this same kind of natural resistance to mildew. That’s why they’re covered in an anti-fungal coating to make up for this.
All awnings should be cleaned with care and if you scrub too hard in one spot, it can weaken the fabric. However, this will be an especially important rule if you have a vinyl awning, as you can also scrub off the protective coating.
PREVENTATIVE CARE
When you’ve got the background info you need, you’ll want to set up a plan to keep your awning clean and functional. One of the biggest problems facing you will be mildew. Coming from the same family as mold, mildew requires the same environment as mold to grow–a dark, damp place with little air circulation–although it’s not as dangerous as mold. That doesn’t mean it doesn’t smell.
To avoid mildew problems, make sure your awning is always dry before you roll it up. This could mean either after it rains or after you wash it. To help keep dirt and grime off, you’ll want to wash, your awning fairly regularly, using a mild soap and soft brush. If you find your awning already has mildew, there are commercial cleaners to help you out. Just make sure it’s not a petroleum-based product.
Also be wary of over-exposure to ultraviolet light. When your awning is left open in direct sunlight, the sun’s harsh rays can wear down the strength of the material after a while, making it more vulnerable to tears.
Finally, be mindful of the wind. Pull in your awning when gusts start to exceed 20 mph. Sometimes you’ll be caught off guard, but we highly recommend keeping an eye on the weather to proactively protect your awning if the wind is going to pick up during the day.
REPAIR AND REPLACEMENT
No matter how careful you are or how thoroughly you maintain your awning, you’ll probably eventually run into a problem. Either an accident or natural wear and tear may lead to a break in the awning or in its mechanisms. No matter what the issue is, we highly recommend not trying to fix it yourself unless you are an experienced professional. Unlike some of the other repairs your RV may need, awnings are highly specialized and most people don’t have any transferable skills to help with the matter. And, because of how they’re made, awnings can actually seriously injure you if you’re trying to fix them and they break.
If your awning needs repairs, then make sure you call a reliable technician, like the ones we have here at Chris Young Trailer Sales. We’ll make sure your RV or Trailer trip stays comfortable and enjoyable, whether you’re from North Dakota, South Dakota or beyond.
4 KEY STEPS FOR TRAILER TOWING
1. CROSS CHAINS
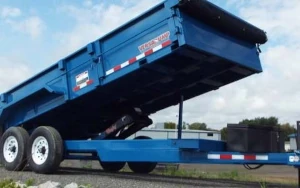
When hauling any type of trailer, make sure you’re crossing the safety chains underneath the hitch. Hook them up so they form an ‘X’ underneath the hitch. This serves as kind of a net, hopefully catching the hitch should it separate from your vehicle while you’re driving. The goal is, that if an emergency occurs and the trailer detaches, the hitch will land in the chains and you will still have some control over it, rather than landing on the roadway and causing an increased amount of damage.
2. INSPECT, INSPECT, INSPECT!
Inspect your trailer and inspect it again. There’s no going back once an accident happens due to an oversight by you or one of your drivers. No matter how tight you tie down a load, it will loosen up as it vibrates down the road. Stop after your first 10 miles and retighten everything, even if you have to go inside of an enclosed trailer. After that, do an inspection every time you pull over for food, fuel or sleep. Do a walk-around inspection of the hitch, wiring, and tires. You probably don’t need to pull out a tire air pressure gauge at every stop, but look at the tires for wear, use your palm to see if they’ve gotten too hot, and give them a kick to hear if one sounds different than the others; this can be a sign of varied air pressure.
3. KEEP THE BATTERY CHARGED
Many of our trailers use a battery to operate electric brakes. These help with slowing down heavier loads. Whether your trailer uses the battery on your towing vehicle or a separate battery or backup battery stored on the trailer, that depends. Either way, be sure to check the charge on the battery regularly. The last thing you want is for your expected braking power to drop dramatically and unexpectedly, forcing you to take defensive driving measures which might cause damage.
4. PLUG IN TRAILER LIGHTS
After connecting your light system to the trailer, make sure they all work. This is one of the biggest complaints we hear from people coming to us because they’re aggravated other trailer operators don’t take the time to make their trailer lights work properly. You’ll want to check your brake lights, hazard lights left and right turn signals and running lights.
4 MISTAKES TO AVOID WHEN TAKING A TRAILER DOWN THE ROAD
Taking your Midsota trailer down the road should be a worry-free experience. While we use the finest processes and materials in making our trailers, day-to-day events and circumstances can lead to an unsafe situation if not monitored. Let’s look at 4 mistakes people make when heading down the road with a trailer, whether that’s up north with a snowmobile trailer, or across the county with a tilt-bed or dump trailer.
1. OVERLOADING
When preparing your load, it’s important to know the gross combined weight rating (GCWR) of your vehicle, along with the gross vehicle weight rating (GVWR) of your trailer (available on our website). Knowing these numbers allows you to properly distribute the load across your trailer, as well as know how your vehicle handles the weight. By watching the heat your engine produces, you’ll know whether you might need to reduce weight on the trailer.
2. AIR PRESSURE
Tire air pressure is incredibly important, both for your vehicle and trailer. You should find the recommended PSI for your vehicle and trailer and ensure the tires match it. Low tire pressure can reduce stability, traction and braking ability. Speaking of brakes…
3. BRAKES
Many Midsota trailer come with self-adjusting electric brakes, and some have the option for surge hydraulic brakes. This is so you can maintain better control of the load when braking is needed, either downhill or coming to a stop. You should check the vehicle and trailer brakes frequently to prevent accidents.
4. HITCH SIZE
Just because a hitch fits, doesn’t mean it sits. If a trailer calls for a 2” hitch, it needs one. The wrong size hitch can throw a hitch into your plans, and be a real danger on the road if you attempt it! Make sure your hitch fits. There are three main types of hitches: 1-7/8”, 2”, and 2-5/16”.
5 MAINTENANCE TIPS TRAILER MANUFACTURERS WANT YOU TO PRACTICE
We love our trailers. All trailer manufacturers do. And while we know they can last a long time, they still need a little TLC from their new owners. With that in mind, here are 5 trailer maintenance tips we, as trailer manufacturers, want you to practice to keep our babies on the road and performing well.
1. CHECK TIRE INFLATION
Tire inflation image
Keeping your tires at the proper air pressure is key to the longevity of the tire and the trailer as a whole. The two minutes it takes to check and properly inflate tires could save you a huge headache later. You should not only check your tire pressure, but you should also keep an eye on the tread depth as well as rotate the tires. Trailer manufacturers like us note that since your load will differ every time you use the trailer and will rarely be even, rotating the tires is a good way to ensure they wear more evenly.
2. INSPECT SUSPENSION
You should visually inspect your suspension for signs of irregular wear, tears or heat cracks on the springs. Trailer manufacturers know nothing should be touching the suspension or interfering with its movement.
3. LUBRICATE REGULARLY
Debris clings to grease, making it ineffective. So, you need to regularly push out the old grease by adding new grease. Be sure you are using grease trailer manufacturers would, with the proper performance characteristics, grade, and thickening system. Most of this can be seen on the packaging, but you may need to check the grease manufacturer’s website or call them.
4. INSPECT BRAKES
As trailer manufacturers, we know every tandem axle or triple-axle trailer is required by law to have properly functioning brakes. Typically at Midsota Manufacturing, we use self-adjusting electric brakes, but also install surge hydraulic brakes on some of our trailers. For the sake of your safety, the safety of those around you, and the lifespan of a trailer, we suggest checking your brakes every few months. Set up a schedule, write it on your calendar, whatever you need to do.
5. CHECK LIGHTS/KEEP TRAILER CLEAN
Many of you in northern states know road salt can take its toll on the body of a vehicle or trailer, but as trailer manufacturers, we know for trailers another big issue is corrosion of the electrical system. So it’s important to wash the trailer often, especially in the winter to keep corrosion at bay. Also, inspect the lights, wires and other places where corrosion may begin so it doesn’t spread.
WIRING DIAGRAM
Trailers are required to have running lights, turn signals and brake lights. The best way to connect these lights together is with a T-One Connector. The T-One Connector is pre-wired to a 4-pole flat that can adapt to a 6 or 7 way round connector. You still must locate the proper wires which can be found in the owner’s manual or found on the chart at the bottom of the page.
CONNECTORS
There are various types of connectors. The connectors may have four to seven pins that allow for the transfer of power for the lighting as well as auxiliary functions. Functions such as electric trailer brake control, backup lights, etc. Choose a connector based on the number of pins for the function needed. The connector should be mounted on the vehicle. When mounted on the vehicle, it will display a clean look and avoid potential problems associated with leaving a connector dangling.
4-WAY CONNECTORS
4-Way connectors are available allowing the basic hookup of the three lighting functions (running, turn, and brake) plus one pin is provided for a ground wire.

6-WAY CONNECTORS
6-Way connectors allow the basic hookup for running, turn, and brake. There are two extra pins in addition to the ground pin that provide two additional functions. The Diagram below shows the proper way to wire the connector to your trailer or vehicle.
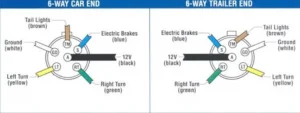
Note: The black (12V) and Blue (Electric Brakes) may be reversed to suit trailer. Horse Trailers may use the center pin for 12V hot lead, R.V. trailers use the center pin for electric brakes.
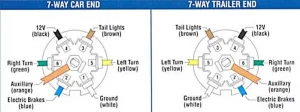
7-WAY CONNECTORS

Besides the three main lighting functions, additional pins are available for auxiliary power, trailer battery charging etc.
5-WAY CONNECTORS
5-Way connectors allow a basic hookup for running, turn, and the brake. The ground pin is available to provide support for another function. Usually, the 5-Way Flat connector is used for trailers with surge brakes. The additional wire is connected to the backup lights and disengage the trailer’s brakes when the vehicle is reversing.


MON – FRI 8AM – 5PM
SATURDAY 8AM – 1PM
SUNDAY CLOSED
MON – FRI 8AM – 5PM
SATURDAY 8AM – 1PM
SUNDAY CLOSED
UNDERSTANDING WEIGHTS
For the safety of your family and others around you, it is crucial to understand and stay within the weight ratings of your RV and tow vehicle.
Vehicle and trailer weight numbers fall into two categories:
The most common confusion about weights occurs when the two above categories are mixed.
On this page we define and provide details about the following weights: Cargo Weight, Curb Weight,Dry Weight, FGAW, FGAWR, GAW, GAWR, GCW, GCWR,GTW, GVW, GVWR, King Pin Weight,Maximum Loaded Trailer Weight, Payload, RGAW,RGAWR, Tongue Weight, UVW
GVW: GROSS VEHICLE WEIGHT
GVW Includes
Gross Vehicle Weight (GVW) is the actual weight of the fully loaded vehicle or trailer, including all cargo, fluids, passengers, and optional equipment, as measured by a scale.
If you are in a motor home and not towing anything, the GVW is the total weight of the RV and everything in it. If your RV is composed of more than one unit (towing a trailer or a vehicle), then the GVW is only part of the total.
The GVW is important because without this number you can not determine if you are within the limits set forth by the manufacturer, laws, and regulations. This number can be approximated based on information provided by the manufacturer or dealer, but the only way to be sure is to drive the RV on a scale and measure it.
GVWR: GROSS VEHICLE WEIGHT RATING
Gross Vehicle Weight Rating (GVWR) is the maximum number that the GVW or GTW should never exceed. GVWR is applied to trailers as well as vehicles, but you may see this rating referred to as the Maximum Loaded Trailer Weight.
GTW: GROSS TRAILER WEIGHT
GTW Includes
Gross Trailer Weight (GTW) is the same as Gross Vehicle Weight (GVW) when referring to a trailer. While GVW can be applied to tow vehicles and trailers, GTW makes it clear that we are speaking of a trailer.
When connected, a portion of the trailer’s weight is transferred to the tow vehicle through the hitch. In this case the GTW includes all axle GAW’s and the Tongue Weight or King Pin Weight.
When not connected to the tow vehicle, the trailer’s weight rests on its own tires and on all deployed support and stabilizing jacks. If you are weighing a trailer without the tow vehicle, be sure to place the entire unit on the scale, including all jacks.
GCW: GROSS COMBINATION WEIGHT
GCW Includes
Gross Combination Weight (GCW) is the actual weight of the fully loaded tow vehicle plus the towed vehicle (trailer, car, boat, etc.), including all cargo, fluids, passengers, and optional equipment.
If your RV is composed of more than one unit (towing a trailer or a vehicle), then the GCW is the total weight of all connected vehicles and everything in them.
Again, the only way to accurately determine the GCW is to drive the entire assembly on a scale. You may also determine the GCW by adding up the individual GVW’s of all components.
If you weigh the components separately, make sure that they are configured and loaded exactly as you will be when traveling.
GCWR: GROSS COMBINATION WEIGHT RATING
Gross Combination Weight Rating (GCWR) is the maximum number that the tow vehicle GVW plus towed vehicle GVW (or GTW) should never exceed.
GAW: GROSS AXLE WEIGHT
Gross Axle Weight (GAW) is the actual weight placed on a single axle. Assuming a well-balanced vehicle, the GAW is then evenly distributed to all tires on that axle.
In addition to the axle weight rating, the GAW must be within the tire weight ratings as well. To determine the amount of weight placed on each tire, divide the GAW by the number of tires on the axle.
You may see the more specific RGAW, when referring to the rear axle, or FGAW, when referring to the front axle.
GAWR: GROSS AXLE WEIGHT RATING
Gross Axle Weight Rating (GAWR) is the maximum number that the GAW of a single axle should never exceed. You may see the more specific RGAWR, when referring to the rear axle, or FGAWR, when referring to the front axle.
TONGUE WEIGHT OR KING PIN WEIGHT
Tongue Weight (also called Tongue Load) is the actual weight pressing down on the hitch ball by the trailer. The recommended amount of Tongue Weight is 10-15% of the GTW.
King Pin Weight (also called Pin Weight) is the actual weight pressing down on the fifth wheel hitch by the trailer. The recommended amount of King Pin Weight is 15-25% of the GTW.
These weights are added to the tow vehicle’s GVW.
CURB WEIGHT
Curb Weight Includes
Curb Weight is the actual weight of a vehicle or trailer including all standard equipment, full fuel tanks, full fresh water tanks, full propane bottles, and all other equipment fluids, but before taking on any persons or personal cargo.
We have seen the following variations to this definition:
Pay close attention to how the manufacturer defines Curb Weight because this is often used to calculate other weights, such as the cargo carrying capacity or Payload.
DRY WEIGHT
Dry Weight is the actual weight of a vehicle or trailer containing standard equipment without fuel, fluids, cargo, passengers, or optional equipment.
We have seen the following variations to this definition:
Pay close attention to how the manufacturer defines Dry Weight because this is often used to calculate other weights, such as the cargo carrying capacity or Payload.
UVW: UNLOADED VEHICLE WEIGHT
UVW Includes
Unloaded Vehicle Weight (UVW) is the weight of a vehicle as manufactured at the factory. It includes full engine and generator fuel tanks and fluids, if applicable. It does not include cargo, water, propane, or dealer-installed accessories. Be aware that some manufacturers weigh each unit to determine UVW, while others provide only the average or estimated weight for each model.
We have seen the following variations to this definition:
Includes actual factory installed options
Includes commonly ordered factory installed options
Pay close attention to how the manufacturer defines UVW because this is often used to calculate other weights, such as the cargo carrying capacity or Payload.
CARGO WEIGHT
Cargo Weight Includes
Cargo Weight is the actual weight of all items added to the Curb Weight of the vehicle or trailer. This includes personal cargo, optional equipment, and Tongue or King Pin Weight.
This number is important because it will determine how many things you can safely pack into your RV. Within this number you need to fit the weight of your clothes, shoes, linens, books, dishes, beer, cleaning supplies, computer equipment, hiking gear, bicycles, water sport implements, food, beer—basically everything you want to take with you.
PAYLOAD
Payload Includes
Even though it does not include an R, Payload is a weight rating. It is the maximum weight that persons plus cargo should never exceed.
Payload is derived by subtracting Curb Weight from GVWR. In other words, the difference between a vehicle with standard equipment and the maximum allowed weight.